Thursday, March 2, 2017

Bye bye - English Blog... (Re)bonjour le français!

Hi all, 
it's been a while that I haven't published anything on this blog and that will sadly be the last time, I'm publishing something ... in english...

The reason is simple. 
In France, we have a really proud culture and our language is part of this pride. Our business is mainly done in French, and many people don't want or can't speak english. 

Studies have showed that a french person who don't speak perfectly english won't spend a lot of time to read an article in english UNLESS... he reallly needs it! 

My goals now, will really be to help the french market to rise on some problematic, I'm meeting in my professional life, and along with my role as a technical evangelist @ Nintex. I realize that there are not many serious articles on some topics in french, and that should be my role to fill the gap. Sharepoint, O365, workflow, processes, forms... eveything is going to be in french now :)

But you can still learn french, it will be easier that understanding a french who tries to speak english!


Thursday, February 26, 2015

Integrate AzureDataMarket API inside your Nintex workflow using JSON service.


Last week, I wanted to integrate more services in a demo Nintex workflow.There are a lot of services already existing, but obviously it was too easy to use what already exists. It is more fun to try to use what hasn't been done before!

Nintex Live Catalog

Nintex Live natively provide a huge set of actions (around 150 at this date) from a large range of services providers including:
  • Twitter
  • Facebook
  • Office 365
  • Sharepoint
  • Yammer
  • WordPress
  • DropBox
  • Bing services (Translate, search, directions…)
  • Docusign
  • Dynamics CRM
  • Salesforce
  • Google Drive
  • Linkedin
  • MailChimp
  • Azure
  • OneDrive
That usually fits most of your need. But what if you need more than that? What if you have identified a service somewhere that you have to consume that is not yet available on the Nintex Catalog?

User Defined Actions

To make the things simple, you will have to design your own UDA (User Defined Actions) on Nintex. The UDA are a super easy way of creating a packaged features based on simple Nintex set of actions.
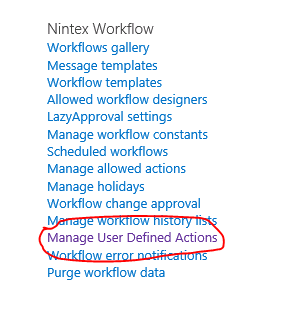
Inside the Site Setting page of your site, under the Nintex Workflow menu, you will find the Manage User Defined Actions. From there you will be able to create your own.
You will be able to define input parameters and output parameters. The user who will use your action will only see those parameters and not the logic that is embedded inside.


Once you have created an UDA, you just have to publish it to your site. It will then be available to all your workflows (there is a section called User Defined Actions in your Nintex actions panel).
If you develop your UDA on your own development environment, you can export the entire UDA (it will generate an .uda file that you can reimport on another environment).
When you plan to create your UDAs, note that you can't have an UDA embedded in another UDA.
The UDA feature is actually only available on the On-Premise version of Nintex Workflow. Nevertheless, it will be available later this year for the O365 version.


Azure Marketplace

The Azure DataMarket's marketplace exposes data using Odata feeds. The Open Data Protocol (ODate) helps you unsiloting your data. On the platform you have access to hundreds of different services. What you need to access it? Just an account.
  1. Create an account on
    https://datamarket.azure.com/.
  2. Ok now you have an account, and what? Just parse all the possibility of the marketplace! But how to embed     those data and services in your Nintex workflow?
  3. Subscribe to a service or an application
  4. In the Azure Datamarket, find the application that suits you. You have application for everything.
  5. Register your application on the datamarket
Why would you need to register your application? Because you want to get some specific credentials for your application. You have two ways of authenticating your application HTTP basic/OAuth. In this case, we will use the OAuth. Llearn more: everything on the authentication and implement OAuth in your marketplace app.
From there, you will have to register your application using this link https://datamarket.azure.com/developer/applications, reaching the following page:


Registering your application will allow you to retrieve two really important information: ClientID and ClientSecret. They are the user/password to authenticate on the service. When authenticated you will retrieve your access_token that you will need for accessing the service itself.
Now you have everything to start!
You will find here https://msdn.microsoft.com/en-us/library/gg193414.aspx everything you need to know about the datasets queries on the market place.


Using JSON service on Nintex

From the previous chapter you have now your ClientID and ClientSecret, so now what should you do with it? Just call the authentication web service and retrieve your access_token!
That seems easy to do... The only problem is that Nintex "Web request" action doesn't handle the JSON! This is actually the entire topic of this article! Let's build a JSON parser inside an UDA!
This is how we gonna do it: 
  1. Build your workflow, and add a Web Request action into it.
    • The authentication service URL is : https://datamarket.accesscontrol.windows.net/v2/OAuth2-13
    • No UserName/password
    • Content type: application/x-www-form-urlencoded
    • Header: grant_type=client_credentials&client_id={WorkflowVariable:ClientID}&client_secret={WorkflowVariable:ClientSecret}&scope=XXXXXXXXXXXXXXXXXX
    (in this case I admit that you have created 2 workflow cariables : ClientID and ClientSecret and that you have put the value to the value of your registered application)

        You will obtain something like :


    The problem is now you will have to handle the results in order to retrieve the access_token.


  2. For this example I have used the bing translation API. Here is what the answer will look like :

  3.  
    {"token_type":"http://schemas.xmlsoap.org/ws/2009/11/swt-token-profile-1.0","access_token":"http%3a%2f%2fschemas.xmlsoap.org%2fws%2f2005%2f05%2fidentity%2fclaims%2fnameidentifier=XXXXXXXX&http%3a%2f%2fschemas.microsoft.com%2faccesscontrolservice%2f2010%2f07%2fclaims%2fidentityprovider=https%3a%2f%2fdatamarket.accesscontrol.windows.net%2f&Audience=http%3a%2f%2fapi.microsofttranslator.com&ExpiresOn=1424878406&Issuer=https%3a%2f%2fdatamarket.accesscontrol.windows.net%2f&HMACSHA256=WM6JE6HyhxZXV0ICcfaWVzDUIyEe78VuPnoN92HHIrY%3d","expires_in":"600","scope":"http://api.microsofttranslator.com"}

     The format of the JSON is {"key":"value","key2":"value2"}.


  4. I could have done it on a single UDA but the purpose of an UDA is to be reusable, and because there could be other usage for them, I have split in two separated UDA.

    • JSON_Stream_parser.uda : this one takes a stream as an input and provides as an output two collections : the keys, and the values
      Download the nwf file :
    • KeyCollection_search.uda : This one takes two collections in input (in our case they will be the output of the previous UDA) and a "KeyToFind" and will output the value. 
      Download the nwf file :
      Download the nwf file :


  5. From the last KeyCollection_search, I search access_token. When you get this you have to add "Bearer :" before the access_token (don't forget the spaces!) and then add it in the header of the webservice call as "authorization". In my Bing translation API case, I will call 
    http://api.microsofttranslator.com/v2/Http.svc/Translate?text=TextToTranslate&from=SourceLanguage&to=TargetLanguage and add an "Authorization" Header and set it with this access_token
  6.  Finally here is what the (simplified) version of the workflow looks like


     As a conclusion, I would just add that my example using Bing translation won't help you because , there is nativelly a Nintex action that allows you to translate using Bing!
    You should check on the Datamarket, there are plenty of examples that you will love to implement!

Wednesday, April 3, 2013

Office 365 - Site MailBox in replacement to Document Library incoming Mail?

I have to say that I have underestimated the site MailBox feature of Office 365.

As explained on the blog of Benoit Hamet http://blog.hametbenoit.info/Lists/Posts/Post.aspx?ID=484,this feature gives a lot of new capabilities, but it comes with its lot of missing features!

After having activating the web scoped feature "Site Mail Box", I have first been surprised in a wrong way by this feature :

It creates an exchange mail box that can be accessed via the interface and where all the members of your site can pick documents and mails. Isn't it great that only by activating a feature it creates you a exchange mail box for your site? After the excitment, come the questions..
With my local Sharepoint 2007-2010-2013 I can configure my library to receive emails and to store documents. With some mix of Rules/workflows/taxonomy/Item receivers I can even create a string redirection system. can I do that with MailBox? apparently no...
Apparently!

I have then configure my Outlook 2013 in order to get my personal Office365 emails offline. And looking inside the menus (I'm curious) I have found this item "Manage All site mailboxes" on the contextual menu of my personal mailbox. (sorry if I don't put screenshots, but mine is in french!)

The first time I clicked on it, nothing was displayed. The basic reason is that office 365 tries to see whether you are in the member/owner group of the site and if not it doesn't provide you the access to the mailbox (even if you are farm admin like I was). Second Try after having added me in the site owner group. The mail box is displayed and it comes up inside outlook with all the document libraries of the site!

You can apply outlook rules on this mail box! So basically, I can redirect whatever I want using those rules!

Play well!

Other sources :
http://blogs.technet.com/b/exchange/archive/2012/08/22/site-mailboxes-in-the-new-office.aspx
or/and (french)
http://spasipe.wordpress.com/2013/03/07/sharepoint-2013-les-site-mailboxes-14-configuration/
 

Monday, March 25, 2013

Create a new Community Template - Discussion/category Product bug

I'm actually working on a office 365 Social network project. Really interesting by the way.
I just lost two days believing that I had done something bad when I found on my newly created community (and actually all others) that the discussion board weren't linked correctly to my discussion board categories. Note that my community  template is not the basic one but a slightly customised one...

So, I have started everything again...  and again the same mistake...

So, I have tried a really basic test : I did the same test with the standard community template and I expected it to work, but there is the same problem with the standard template!
I tested it as well on my local environment the problem is exactly the same.Let's correct it!


  1. Open you newly created category.aspx page
  2. Open the two problematic webpart's property panel
  3. Change the view :
    1. for the proposed discussion webpart, set it to "Proposed discussion"
    2. for the other one, set it to "subject"
  4. From now, once you validate your page, you will have everything almost working, the only left problem is that you don't see the discussions according to the category of the page. let's continue.
  5. Open two instances of Sharepoint Designer 2013. One on the source site, and one on the target site. On both open category.aspx page
  6. On the target page, in all the xsltlistviewwebpart's parameterbinding, there is binding missing, you have to add it! 
  7. Almost at the end of page of your source page, locate the {CategoryID}, you will have to place it exactly at the same place on your target page.
  8. Save it.
  9. Test it & pray !


Thursday, November 22, 2012

Yammer For free with sharepoint Online

Announced at the Sharepoint conference 2012, and posted on the sharepoint Blog
http://sharepoint.microsoft.com/blog/Pages/BlogPost.aspx?pID=1049

"Beginning March 1, 2013, Yammer will be available to Microsoft Enterprise Agreement customers. Enterprise Agreement customers will be able to purchase Yammer Enterprise via Microsoft volume licensing. Microsoft has also created a set of combo SKUs for SharePoint Online (Plan 1 and Plan 2) + Yammer Enterprise. SharePoint Online + Yammer provides customers with a world-class collaboration platform and enterprise social capabilities.

Yammer Enterprise will also ship with Office 365 for enterprises (Office 365 E Plans 1–4). Office 365 customers will have rights to run Office 365 for access to email, calendars, Office Web Apps, instant messaging, and file sharing and will have Yammer Enterprise for social.

Along with shipping Yammer with some of our most popular services, we will also be lowering the price for Yammer Enterprise standalone. Yammer Enterprise standalone will be available for $3 per user/per month (vs. the original price of $15 per user/per month). Yammer Basic standalone will also continue to be offered for free.

Beginning March 1, 2013:

  • Yammer Basic standalone: $0
  • Yammer Enterprise standalone: $3 per user/per month
  • New! SharePoint Online (Plan 1) + Yammer Enterprise $4 per user/per month
  • New! SharePoint Online (Plan 2) + Yammer Enterprise $8 per user/per month
  • Office 365 E Plans 1–4 + Yammer Enterprise $8–$22 per user/per month

(all pricing in USD)

Visit the Yammer pricing page to learn more. Stay tuned for more information in the coming months as we add more buying plans!
"

Friday, November 9, 2012

Sharepoint 2013 Newsfeed Vs Office 365 newsfeed

You have liked the newsfeed of Office 365 giving the capability to display videos and images directly on the newsfeed... Your enthousiasm will fall down when you open the newsfeed of Sharepoint 2013...

The videos and photos display simply disappears.

So far, the problem has been mentionned several times on posts
http://community.office365.com/en-us/preview/forums/717/p/72621/273783.aspx
or
http://social.technet.microsoft.com/Forums/en-US/sharepointadmin/thread/1c57452a-12c0-4e11-aa59-f3bc7900d7a7

UPDATE : 14/11/2012
My mistake (I don't erase the current post because the mistake can have been done by others) !!

In fact on the communities sites, the discussion list created as default on the community sites is not displayed on the Office 365 community site. On those sites the site collection feature "Site Feed" is activated and it is the newsfeed that is displayed as main page. There you have the preview displayed and you can embbed photos and videos!


Sharepoint 2013 - Add Geolocation Field in the display view of a discussion List

Imagine the scenario : You 'are on a community, you want to be able to post your position on a post to show the other users your localization. (FB like).

The idea WOULD be :
  • Add a geolocation field
  • Add the field to the display
  • TADAAM it works...
Well obviously, it doesn't!

The method is a bit more complicated. We've worked on it with Laurent Fauret (also from Sogeti) who made the js updates :

Step 1 : Create a site Column Geolocation field
The geolocation fields can't be created manually. So you have to create them using A powershell script or Using Create Geolocation field projet on Code.msdn.microsoft. Add a field in yor discussion list.

Step 2 : Update the discussion display file
The problem is that you never open the viewItems.aspx form when you navigate inside a discussion, you are always on a custom view, so the field you have added on your list, will never show up! So, it means that you have to modify the display js file!

This is not a good way of doing but it's a fast one! You should never touch the standard file of sharepoint, but instead create your owns specific but in this case we will do it for demo purpose (the good way would be to create a discussion list type based on the new display js file!)

So you have to modify the sp.ui.discussions.js located in the 15/TEMPLATE/Layouts. It manages the display of the discussion list. (use the sp.ui.discussions.debug.js to have the indented version).

  • Add your field in the viewfields list in the function
     SP.UI.Discussions.Helpers.$1f = function (m, i) 
  • Change the $2u_0: function (a, d)  to
     $2u_0: function (a, d) {
        ULS06I:;
        this.populateFolderMetalineItems(d);
        a.addCssClass("ms-comm-metalineList ms-noList");

        a.renderBeginTag("ul");
        if (this.jsonItem["My_x0020_Location"]) {
            a.addCssClass("ms-comm-metalineItemSeparator");
            a.addCssClass("ms-comm-metalineItem");
            a.renderBeginTag("li");
            a.write(spMgr.RenderFieldByName(this.$0_0, "My_x0020_Location", this.jsonItem, this.$0_0.ListSchema))
            a.renderEndTag()
        }
        for (var b = 0, c = this.$R_0.length; b < c; b++) {
            b !== c - 1 && a.addCssClass("ms-comm-metalineItemSeparator");
            a.addCssClass("ms-comm-metalineItem");
            a.renderBeginTag("li");
            a.write(this.$R_0[b]);
            a.renderEndTag()
        }
        a.renderEndTag()

    },

  • Change the $2y_0: function (a) { to$2y_0: function (a) {
            ULS06I:;
            var loc = spMgr.RenderFieldByName(this.$0_0, "My_x0020_Location", this.jsonItem, this.$0_0.ListSchema);
            if (loc) {
                a.addCssClass("ms-metadata");
                a.addCssClass("ms-comm-cmdSpaceListItem");
                a.renderBeginTag("span");
                a.write(loc);
                a.renderEndTag();
            }
        a.addCssClass("ms-metadata");
        a.addCssClass("ms-comm-cmdSpaceListItem");
        a.renderBeginTag("span");
        var b = spMgr.RenderFieldByName(this.$0_0, "Created", this.jsonItem, this.$0_0.ListSchema);
        a.write(b);
        a.renderEndTag()
    },


Note :We have called our column "My Location".


Step 3 : Test
It works only on your /discussion%20List/forms/allitems.aspx ... but it f you want to see it working on your site homepage (where the discussion list is already put), you have to revalidate the "subject" view on the discussion list Webpart for the view to be updated with your new field.
An now you will see your GeoLoc picto on your discussion!


And on the click